TM 10-3610-202-14
(3)
Store camera lens.
(4)
Disconnect the two camera light electrical
connectors from the rear of the camera.
(5)
Unlatch the retaining straps securing the
camera left light to the shelter wall, if required.
(6)
Unlatch the retaining straps securing the
right camera light to the camera light holddown, if
required.
(7)
Remove the attaching bolts securing the
camera light holddown bracket to the shelter floor, if
required.
(8)
Remove the bracket.
(9)
Raise the camera bellows.
(10)
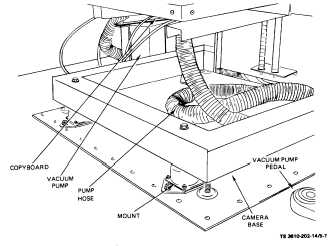
Remove the four attaching bolts securing
the camera base to the mounts. (See fig. 5-7.)
Figure 5-7. Camera, Removal and Installation
(11)
Using an Allen wrench, loosen the camera
light arms retaining studs.
(12)
Position both camera lights in as far as
possible.
(13)
Carefully slide the camera toward the
center of the shelter.
(14)
Remove both camera light assemblies
and place in protected area.
(15)
Disconnect vacuum pump connectors at
rear of camera.
(16)
Turn the front of the camera toward the
shelter door.
CAUTION
The camera should be removed
very carefully because of the
close proximity of other shelter
components.
(17)
Using two men, carefully remove the
camera from the shelter.
(18)
Remove the screw attaching the film case
cover retaining clamp and remove the clamp. (See fig.
5-8).
5-15