TM 10-3610-202-14
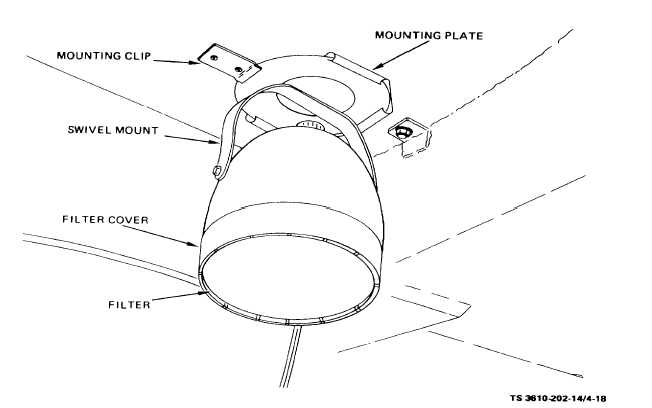
Figure 4-18. Safelight Assembly, Removal and Installation
(2)Inspect safelight casing and filter for damage.
Replace as necessary.
(3)
Inspect power cord and switch for proper
operation.
(4)
Inspect safelight bulb for proper operation.
b.
Removal
If
inspection
indicates
that
replacement of the safelight is necessary, remove the
unit as follows:
(1)
Disconnect safelight power cord.
(2)
Remove the two screws which secure the
safelight mounting clip and remove the mounting clip.
(3)
Slide the safelight from mounting plate on
shelter ceiling.
c.
Installation Install new safelight assembly as
follows:
(1)
Slide the safelight into the mounting plate
on shelter ceiling.
(2)
Position
mounting
clip
and
install
attaching screws.
(3)
Connect safelight power cord..
(4)
(Check safelight for proper operation.
d.
Repair. Repair of the safelight assembly
includes replacement of filter and bulb.
(1)
Filter replacement. Replace safelight
filter as follows:
(a)
Grasp filter cover and rotate cover
counterclockwise until cover key lugs are aligned with
casing keyways. Pull cover and filter from casing.
(b)
Remove filter from cover.
(c)
Position replacement filter in cover.
(d) Align cover key with casing keyways
and push cover onto casing. Rotate cover clockwise
until secure. (2)Bulb replacement. Replace safelight
bulb as follows:
(a)
Grasp filter cover and rotate cover
counterclockwise until cover key lugs are aligned with
casing keyways. Pull cover and filter from casing
(b)
Unscrew bulb from socket
(c)
Screw replacement bulb into socket.
(d)
Align cover key with casing keyways
and push cover onto casing. Rotate cover clockwise
until secure.
4-37