TM 11-6780-225-35
tioner unit make certain the A frame is securely anchored
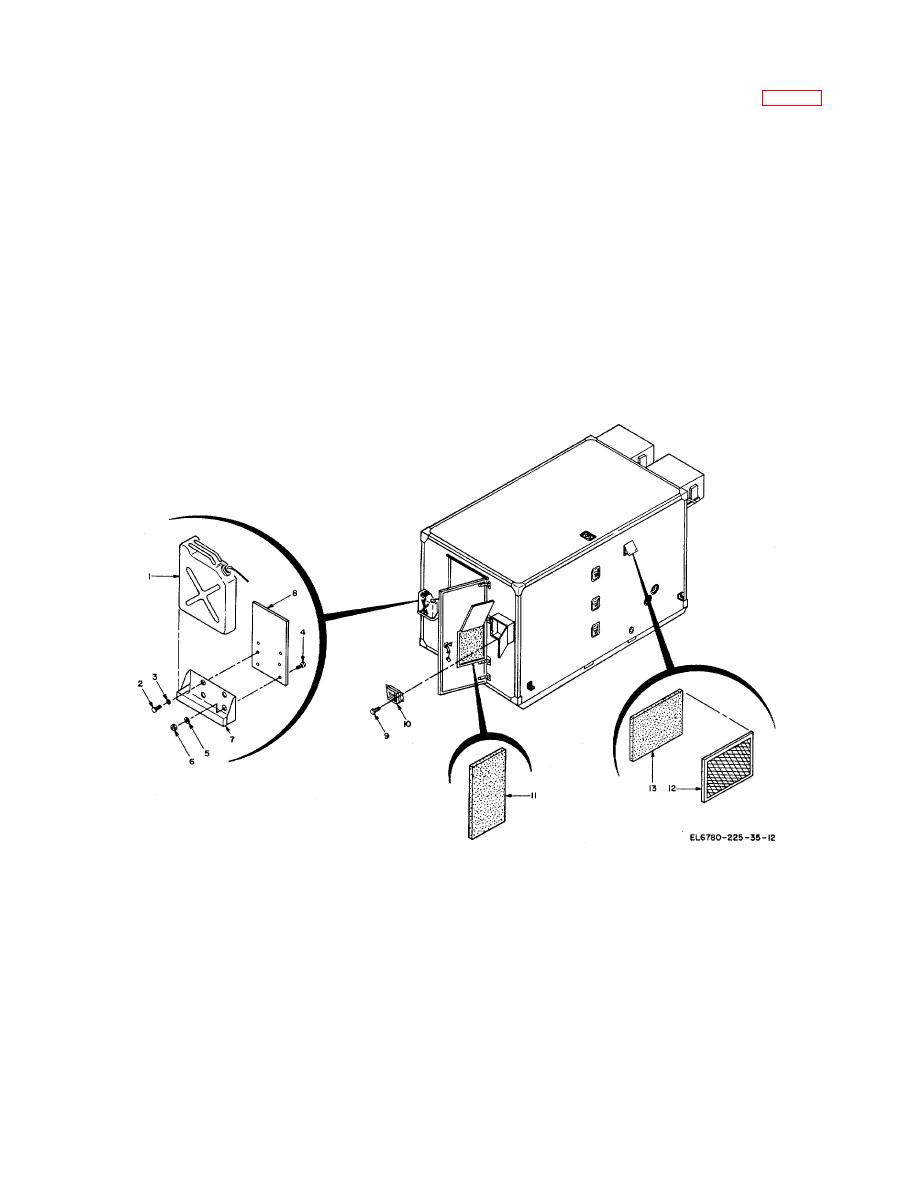
3-15. Aft and Curbside Erterior Repair (fig. 3-5)
and the hoist capability is 1,000 pounds minimum.
a. Disassembly.
(1) Remove fuel can (1).
(1) Install outlets (37) with screws (36).
(2) Remove screws (2), washers (3), screws
(2) Install mount (35) with screws (34).
(4), washers (5), nuts (6), holder (7), and plate (8).
(3) Install brackets (16) and (33) with attaching parts
(3) Remove screws (9) and intercom (10).
(30), (31), and (32) using screws (29).
(4) Remove filter (11), screen (12), and filter
(4) Install angles (25) and (26), with attaching parts
(13).
(17), (18), (21), (22), (27), and (28) using screws (16),
b. Cleaning and Inspection.
(20), and (26).
(1) Remove all oil, grease, and dirt with a stiff
(5) Install air conditioner(s) with attaching parts
bristle brush and cleaning compound.
(12B) through (14) using screws (12A).
(2) Inspect and repair any exterior damage.
(6) Install plate (12) with screws (11).
c. Assembly.
(7) Install jack pads (8) with screws (7).
(8) Install plate (6) and chimney (5) with screws (3)
NOTE
and washers (4).
Assemble using new filters.
(9) Install cap (2).
(10) Install filter (1) and lower door.
1
Fuel can
(AS6MP1)
8
Plate
(A36MP8)
2
Screw
(AS36H1)
8
Washer
(AS6H2)
10
Intercom
A36MK4
4
Screw
(A36H8
11
Filter
A36MP4)
5
Washer
(A36H4
12
Screen
A36MPs
6
Nut
(A86H)
18
Filter
A86MP6
7
Holder
A26MP2)
Figure 3-5. Aft, curbside, exterior exploded view.
3-15


