
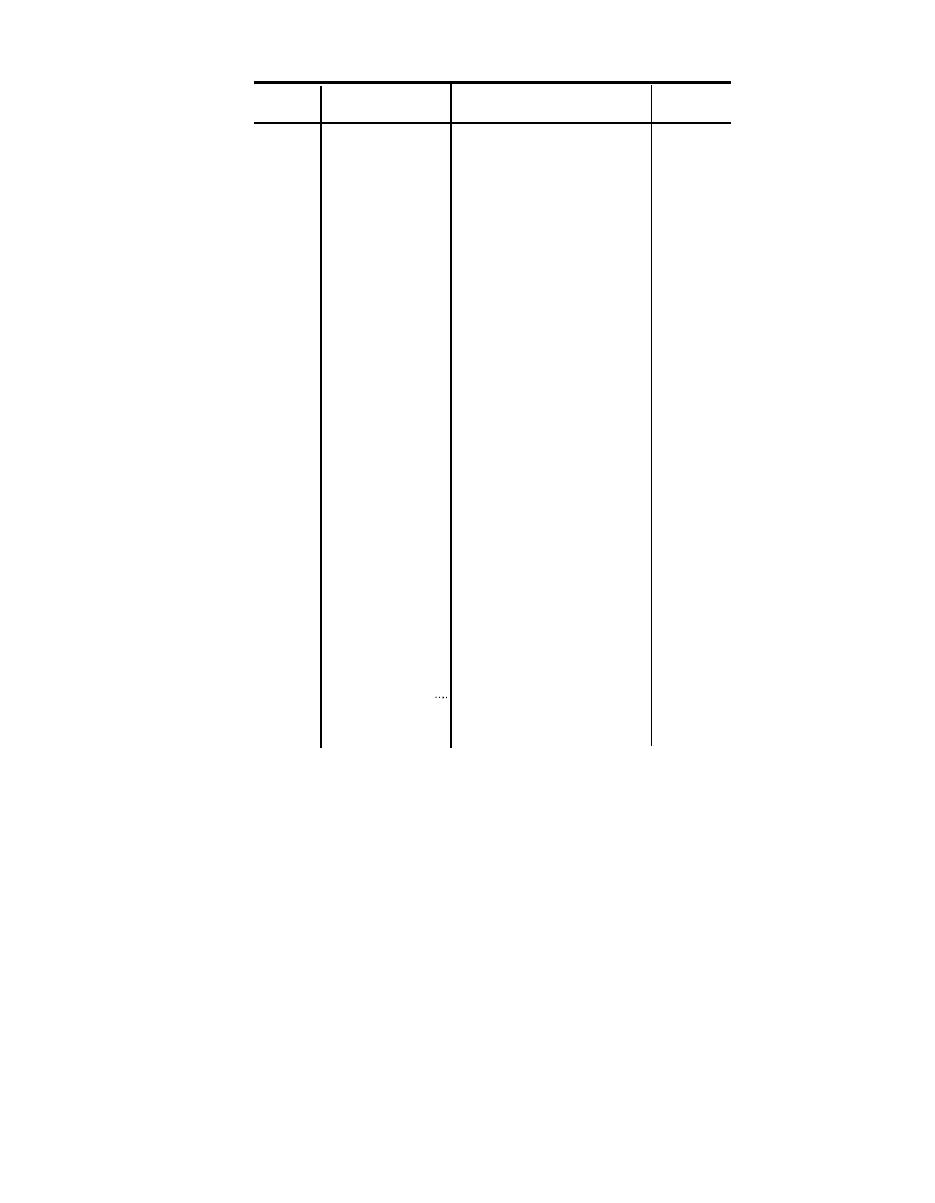
39. Daily Preventive Maintenance Checks and Services Chart
item
References
Procedure
Sequence
No.
See that the equipment is
1
complete (appx III).
Exterior surfaces
Clean the metal surfaces, pro-
2
jection head assembly win-
dow (fig. 3), plate glass
cover (fig. 2, 2.2, and 26.1)
and projection lens (para.
41).
Par. 42a.
3
Raise front shelf (fig. 2.2,
Shelves . . . . . . . . .
26, and 26.1) of projector
(PH-637/PFP, PH-637B/
PFP, PH-637C/PFP) ;
raise left-hand shelf of pro-
jector.
Par. 42b.
Connect power cable (on PH-
4
Power cable . . . . .
637/PFP and PH-637A/
PFP) to projector, then to
power source (para llh).
Remove lens cap, and operate
5
Par. 42c.
Starting . . . . . . .
on-off switch (fig. 2, 2.2,
and 26.1) to ON.
Place transparency flat on
Focusing . . . . . . . .
6
on projection stage, and
focus image on screen by
adjusting focusing knob.
Tighten support post locking
Centering . . . . . . .
7
knob (fig. 27). Center image
on screen by moving pro-
jector (for horizontal cen-
tering) and adjusting mir-
ror elevation knob (fig. 2,
2.1 and 2.2) (for vertical
centering).
Attempt to rotate projection
Projection head
8
head assembly to left and
assembly.
to right; projection head
assembly should not rotate.
Check image on screen fox
Lopsided image
9
horizontal and parallel top
and bottom edges.
Operate on-off switch to OFF
Stopping . . . . .
10
3
TAGO 5909B

